If you’ve ever attempted doing your own nails, you are aware of how difficult it is. In the long run, it can save you money, but it can also take twice as long as going to the nail salon. Oh no. Additionally, depending on the type of nails you’re wearing—I’m looking at you gel nail polish—removing your own nails can be difficult. This is particularly true if you enjoy wearing acrylics, a long lasting artificial nail that can give your natural nails more length and shape but also takes time and patience to properly remove.
In actuality, even if you removed your acrylics yourself, most experts would probably prefer that you go to the salon. Serious nail damage can arise from improper technique, such as breaking or tearing them off. Anastasia Totty, a nail technician and brand educator for Lechat says, “I always recommend seeing a professional because afterward, they can also give you a classic manicure or gel base that will help you strengthen the natural nail after you soak off.”
Meet Our Experts:
Anastasia Totty works for LeChat Nails as a nail technician and brand educator. Syreeta Aaron works for LeChat Nails as a nail technician and brand educator. Sarah Bacchus works as a nail technician at Queens New York’s Sarahbnails.

However, not everyone has the time or resources to schedule touch ups or removal appointments with a nail technician every few weeks. According to Sarah Bacchus, a nail technician at Sarahbnails in Queens, New York removing acrylic nails yourself is pretty simple and easy to do at home, provided you know what you’re doing. All you need is the appropriate equipment and expertise.

Here’s all the information you need to remove acrylic nails on your own, including the tools you’ll need, how to do it correctly to prevent long term damage to your nails, and products you can use to give your fingertips strength and moisture once the procedure is finished.
What you’ll require
You’ll need a toolkit full of supplies if you prefer to do your nails at home. Nail clippers, a nail file, acetone based nail polish remover, cotton balls aluminium foil, a bowl, and a cuticle pusher are all essential, according to Bacchus. A nail drill, a nail buffer, cuticle oil, and a nail strengthener are some optional tools that can speed up the process or maintain the health and appearance of your nails after your acrylics are removed.
What You Should Read Next
Some of these items might already be lying around in your house. For example, you might already have some aluminium foil in your kitchen and cotton balls and a nail clipper in your bathroom. According to Bacchus, you should be able to find all the necessary tools at your neighbourhood beauty supply store if you’re not already stocked. She continues, “You can also check pharmacies and convenience stores.”
After covering the fundamentals continue reading for detailed instructions on how to restore your nails to a pristine state.
Step 1: trim your extensions.
First and foremost, you must properly trim your nails. Although losing length is unfortunate, it will expedite the removal process. (The fewer nails you need to cut, the better According to Totty, it is best to use toenail clippers to trim all of the acrylic extensions near the free edge of the nail.
Use your best judgement as you go because, of course you don’t want to cut down to the point where you are sensitive or in pain. According to Bacchus you should cut your extensions with your palms facing the sky. Then you can eye-ball it.” She continues This method will help ensure you don’t cut your nails too short and end up damaging your skin.
Step 2: File your acrylics’ tops
In order to help remove the topcoat layer of polish it’s time to file the tops of your shortened nails as well. In the end, it will make it easier for the nails to dissolve when it’s time to use the nail polish remover in the following step, even though it may seem time consuming.
Syreeta Aaron, a nail technician and brand educator for LeChat Nails suggests using a standard 100 180 grit file to accomplish this. This grit is usually present in your typical store bought nail file but make sure to check the label on the packaging or the file itself. Overly fine files 240 and above won’t be sufficiently abrasive to complete the task. However, if you’re not careful, files that are too coarse (below 100) could harm your natural nail bed or the skin around it, according to Bacchus.
However, make sure not to start drilling your own nail bed and to check on your nails every five to ten minutes to see if the acrylic has softened. And keep in mind to change the nail drill’s direction when switching hands, advises Aaron. “For instance if you are right handed and filing with your left hand, you will file forward; if you are filing with your left hand, you would put the electric file in reverse.” You can keep control of the machine by using this method.
Step 3: Use acetone to soak your nails.
To complete this step fill a bowl with nail polish remover and soak your fingers for 30 to 60 minutes. Bacchus advises checking your nails every ten minutes to make sure the acrylics are dissolving layer by layer.

The aluminium foil method is an option if you would rather not soak your nails, but according to Bacchus, it usually takes longer. Soak a piece of cotton in remover and place it on the remaining acrylic on your fingernail Totty advises. “Wrap a piece of aluminium foil around your finger to tighten and secure it, then repeat the process for the remaining fingers.” Wait at least fifteen minutes before attempting to remove the acrylic using a cuticle pusher when using the foil method.
Step 4: Take off any leftover acrylic
Use your cuticle pusher to check if the acrylic has softened after soaking. According to Totty when it’s ready for removal, it will look like flakes of acrylic powder that you can push away from the cuticle towards the free edge.
After soaking, the acrylic should be fairly easy to push off. However, soak them once more and check every five minutes if there are still some that won’t move. Congratulations once you’ve finished this step You’ve successfully taken off your acrylic nails at home. Continue reading to find out how you can remove the artificial nails and then refine your natural nails.
Step 5: Buff and shape your nails
After removing the acrylic thoroughly wash your hands. After the acrylics are removed, there’s a good chance the edges will be slightly jagged so file your nails to the shape you want, according to Bacchus. You can avoid unintentionally scratching yourself or getting your nails tangled in your clothes by filing them now.
The tops of your nail beds may remain quite rough and textured after acrylic removal. Bacchus advises buffing your nail beds just to create that smoothness again.
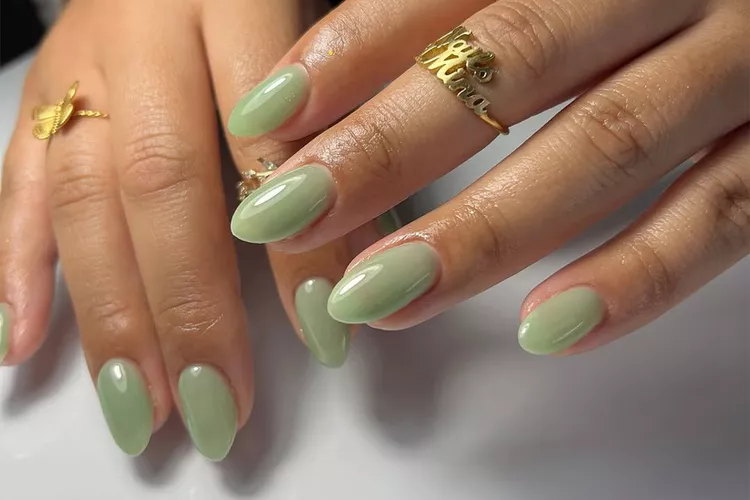
You can do anything you want now that your nails are smooth and shaped Therefore, now would be the ideal time to apply a new coat of polish or return to the salon for a fresh set of artificial nails. However you are also free to show off your natural nails.
Step 6: Strengthen and hydrate your nails
Your nails have endured a lot during the acrylic removal process including clipping, filling, soaking, and buffing. Apply a light hand cream of your choice after giving them some gentle loving care with a cuticle oil or nail strengthener.
Keep an eye out for nail strengtheners that include keratin calcium biotin and vitamins A and E. These components function to enhance the general condition of the cuticle and nail bed.
According to Bacchus, cuticle oil is particularly crucial because the acetone used to remove it can dry out your nails, increase their brittleness and remove their natural oils. Whoa However, by restoring moisture, cuticle oil can prevent those problems. Additionally it’ll help with the growth of your nails, Bacchus continues.
Experimenting with length, shape and style all of which can be challenging to accomplish naturally is enjoyable when done with acrylics. Ultimately though maintaining the strength and health of your natural nails is the true victory.
Giving your nails a little extra care with cuticle oil nail strengtheners and hand cream will pay off in the long run whether you’re wearing a new set of acrylics or embracing your bare nails Cheers to nails that are stunning durable and prepared for your next style.