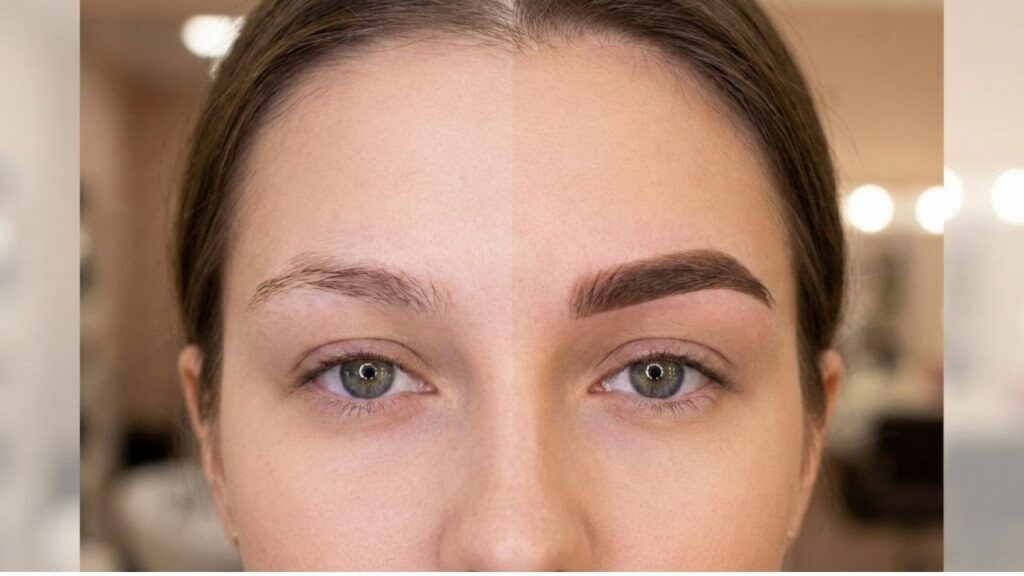
It feels like the ideal beauty shortcut to wake up with full well-shaped brows without using a pencil. The colour can last three to six weeks if you properly tint your eyebrows at home. It’s crucial to exercise caution and control so that your eyebrows complement your face and appear natural rather than overly messy or dark. You can safely and neatly tint your eyebrows at home without creating a mess in your bathroom by following this guide.
Why Considering At-Home Brow Tinting Is Worth It
There’s more to at-home brow tinting than just saving money on salon visits. While a professional appointment only covers one session, a single tint kit usually supplies enough product for several uses. When you do it yourself, you determine the final shape how soft the front looks, and how dark the colour should be. The faint stain on your skin goes away after five to seven days, and the colour in your hair typically lasts three to six weeks. This results in a gradual fade rather than a sudden shift.
Another advantage is the flexibility every time. Every time your hair colour changes or your preferences for makeup change with the seasons, you can change the shade or the timing. Even if you don’t wear makeup, having control over this tiny detail often makes your entire face look more polished and put together.

The Real Duration of Brow Tint
Your skin type daily routines, and product usage all affect how long your brow tint lasts. Because hair retains pigment for a much longer period of time than skin, brows gradually soften rather than completely disappear.

| Factor | What You’ll Typically See |
|---|---|
| Normal or dry skin with mild cleansing | Skin stain fades after about a week; defined colour lasts for three to six weeks. |
| Strong sun exposure frequent swimming or oily skin | Fading noticeably after two to three weeks |
| Exfoliants balms or heavy oils close to the brows | Colour fades more quickly particularly on the skin. |
Freshly tinted brows will last longer if you treat them gently, using less heat rubbing, and harsh cleansers.
What You’ll Require Before Beginning
Professional equipment is not necessary, but knowing the fundamentals will help you achieve safer and more consistent results: Ammonia-free brow-specific tint or gel The brand suggests a glass or plastic mixing cup and spatula as an oxidant or developer. Precision or angled brow brush Cotton swabs and pads Use petroleum jelly or thick cream to shield your skin. Gloves and a spotless spoolie Gentle toner or micellar water A phone stopwatch or timer. Safety is crucial. Don’t colour your brows with ordinary hair dye. Certain dyes have the potential to cause severe eye damage, and substances like PPD (p-phenylenediamine) are known to cause allergic reactions, particularly on sensitive facial skin.
The Reasons Patch Testing Is Unavoidable
Apply a tiny bit of the blended product on the inside of your elbow or behind your ears before applying any tint. For 48 to 72 hours, don’t cover that area. You should not use the dye if you experience redness itching swelling, or blistering. You can prevent uncomfortable and noticeable reactions close to your eyes by taking this easy step.
How to Get Natural Salon-Style Brows at Home in Just Seven Steps
Shape Your Eyebrows One Day Early
Tweeze the stray hairs that are obviously in the area between your two eyebrows as well as above and below them. When you tweeze, avoid making the main eyebrow shape thinner. To create the desired eyebrow shape, lightly sketch its outline with a pencil. To ensure that the tint applies smoothly and evenly across your brows, clean the entire area with micellar water and gently wipe away any excess oil from the skin.
Protect the Skin Around It
Cover the pencilled outline you made with a thin layer of thick cream or petroleum jelly. Don’t get it on the brow hairs themselves. This barrier helps you achieve cleaner and sharper edges by preventing unwanted staining.
 This 7,000-year-old stone wall found off the coast of France may be the work of hunter-gatherers
Blend the Tint Evenly
As directed on the package, combine 0.5 to 0.75 inches of tint with developer. Each ingredient is used in equal amounts in the majority of products. Stir the mixture until there are no more lumps and it is smooth and creamy. Select a hue that is one or two shades darker than the colour of your eyebrows. Don’t choose a shade that contrasts too much with the colour of your hair.
Where Brows Are Fullest Apply
Begin at the area of your eyebrow nearest to your nose on the inside. Make sure every hair on your eyebrows is fully covered by applying tiny strokes in the same direction as they grow. Use a little less product as you proceed, but keep working toward the outer end of your eyebrow. Make sure your grey or light-colored hair is fully covered so your eyebrows appear uniform rather than uneven.
Take Care and Keep an Eye on the Time
According to the brand’s recommendations set your timer. This typically takes seven to fifteen minutes. After three to five minutes, you should gently comb through the inside of your eyebrow with a clean spoolie brush. This keeps your brows from appearing overly harsh or blocky and helps soften the front portion.
Gently remove and condition
The recommended time which is usually between 7 and 15 minutes should be followed when setting your timer. After three to five minutes you should carefully comb through the inside of your eyebrow using a clean spoolie brush. This step prevents your brows from appearing excessively severe or blocky and helps create a softer appearance at the front.
Examine Natural Light and Start the Aftercare Process
Before examining the symmetry in daylight, let the colour settle for about an hour you. You can easily use makeup to balance out the slight differences between the two brows, which are perfectly normal. For the first twenty-four hours following the procedure, be sure to keep your brows dry. Additionally, for a few days after your appointment, avoid using any oil-based products and refrain from exfoliating the surrounding area.

Typical Errors in Brow Tinting to Avoid
- Ignoring the patch test can irritate your skin unintentionally.
- A harsh phoney appearance is frequently produced by selecting a shade that is too warm or dark.
- Because scrubbing irritates skin and damages hair follicles, you should use gentle wiping motions when removing tint.
- If you don’t take care of your tint properly, it will quickly fade from exposure to heat sunlight or harsh cleaning agents.
A Minor Modification That Has a Significant Impact
Your appearance can be significantly improved with a quality brow tint. Your eyes stand out more and your skin looks more renewed. Your face appears put together even without makeup you. You can tint your brows at home and experience weeks of effortless definition if you prepare them correctly use safe products and take care of them afterwards. You won’t be able to live without it once you figure out the proper technique for your eyebrows.
 11 Winter Nail Polish Shades Trending Everywhere This Season for a Fresh Polished Modern Look