More and more plant lovers are replacing cluttered jars and cloudy glasses with a simple, nearly free idea: a pine cone picked up during a woodland walk that transforms ordinary cuttings into a decorative focal point rather than background mess.
Anyone who propagates houseplants knows the usual picture: old mugs, jam jars and random bottles lined up along a windowsill, each holding a fragile stem. Practical, yes. Attractive, not always.
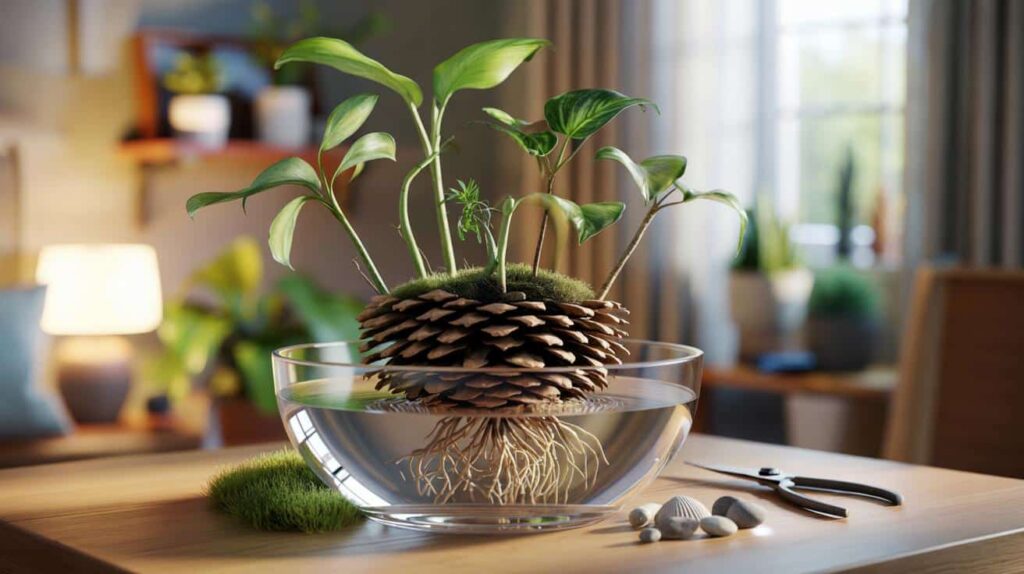
The clever shift is seeing a fallen pine cone as more than seasonal décor. It is actually a small piece of natural engineering designed to respond to moisture. That built-in movement can be used to hold cuttings upright, almost like a ready-made bouquet holder.
 A new set of eight spacecraft images reveals the interstellar comet 3I ATLAS in astonishing clarity
When dry, a pine cone spreads its scales wide open. Once it absorbs water, those scales draw inward, gently gripping whatever sits between them.
This moisture reaction evolved to protect and release seeds, and it works without electricity or tools. For indoor gardeners, it functions like a natural clamp.
Why a pine cone makes an ideal propagation base
Each scale of a pine cone contains layered plant fibers that expand at different speeds when exposed to water. This creates a hinge effect. In dry air the cone opens; in moisture it closes.
If you slide plant cuttings between the open scales and then place the cone in a shallow bowl of water, the scales begin to tighten within a few hours. As they close, they softly secure the stems, keeping them upright and grouped.
Compared with standard glasses or test tubes, a pine cone stand offers clear advantages:
it gathers multiple cuttings into one compact holder
it has a low, stable base that sits securely on a sill
it looks decorative instead of purely functional
it costs almost nothing when collected outdoors
Placed on a table or shelf, it feels more like a sculptural centerpiece than a propagation station, which appeals to anyone who prefers tidy, intentional spaces.
What you need to create your pine cone display
The supplies are refreshingly basic and often already available at home.
Basic materials:
one large, clean, fully opened pine cone
a watertight bowl or shallow dish
small stones, clay pebbles or shells for weight
a bit of moss or damp sphagnum (optional)
sharp secateurs or a clean knife
4 to 8 stem cuttings about 15 cm long
Select cones that are free from mould, visible insect damage or sticky sap. A wider cone makes inserting stems easier without snapping the scales.
This technique works best with plants that root quickly in water and have flexible stems. Good options include:

pothos and scindapsus
philodendron varieties
monstera adansonii
tradescantia
string of hearts
peperomia
soft herbs such as mint
These plants produce roots from their nodes, the small joints along the stem. When those nodes sit in water, roots often develop within days or weeks depending on light and warmth.
Step by step: turning a cone into a living centerpiece
1. Clean the cone
Brush away debris with an old toothbrush or paintbrush. Soak briefly in water mixed with a splash of white vinegar or diluted alcohol to reduce fungal spores. Allow it to dry fully so the scales reopen.
2. Prepare the cuttings
Using a sharp, clean blade, cut just below a node. Aim for stems around 10–15 cm long. Remove lower leaves so no foliage sits in water, as submerged leaves can rot.
3. Build the arrangement
When the cone is fully open, gently insert stems between the scales, spacing them evenly. Place the cone into the bowl and surround the base with stones to prevent floating. Add water until it reaches the lower stem nodes but does not submerge the entire cone.
Caring for your pine cone propagation stand
Position the display in bright, indirect light. Avoid harsh midday sun, which can overheat the water and stress new roots.
Top up water as it evaporates and replace it whenever it appears cloudy or develops an odor. Clean water reduces bacteria and supports healthy root growth.
When roots reach several centimeters in length, transfer the cuttings into soil. Use a light potting mix and keep it evenly moist for the first couple of weeks while the roots adapt from water to soil conditions.
If the cone begins to soften, allow it to dry completely for several days before using again. Proper cleaning and water changes usually allow the cone to last for months.
Why this simple method resonates with plant enthusiasts
This approach does more than improve appearance. It reshapes how propagation feels. Instead of hiding jars behind curtains, you display the process as part of your interior design.
It is also educational. Children can observe how the cone reacts to moisture and watch roots develop in real time. For small apartments, it offers a compact way to expand a plant collection without immediately investing in extra pots.

| Aspect | Pine Cone Stand | Standard Glass |
|---|---|---|
| Stability | Wide, low base resists tipping | Narrow base, easier to knock over |
| Aesthetic | Natural, sculptural appearance | Functional and often mismatched |
| Capacity | Holds multiple stems together | Usually one or two stems |
| Cost | Free if foraged | Requires separate containers |
With a little creativity, a single pine cone can evolve from a simple forest find into a practical and beautiful propagation tool, connecting outdoor discoveries with indoor greenery in an elegant way.