The radiator clicked on with its familiar metallic rhythm, a sound that usually meant warm comfort inside. The wind blew through the bare branches outside, tapping on the windows as if to warn that colder days were coming. Inside, the room was warm, but the air felt thin and dry. Your throat hurt, your hands were tight, and your nose was about to sneeze.
Eyebrow Gel Made at Home
That was when a memory came back to me. I had heard it from an older family member or read it online: putting a glass of water near a radiator to make a room feel warmer. It sounded strange, like an old wives’ tale. You still filled a glass and put it next to the heat source as the night went on and the dryness became more obvious. Something began to change slowly and quietly, like how winter often shows its effects without saying anything.
The Hidden Science Behind a Glass of Water
It seems almost too good to be true that a simple glass of water could make you more comfortable without raising your heating costs. Water doesn’t make heat, and it definitely isn’t a hidden heater source. The change happens in a different place entirely. It’s not about making you feel warm; it’s about helping your body feel warmth that’s already there.

Why dry air makes warm rooms feel cooler
Your body is always giving off heat to the things around it. When the air is very dry, the moisture from your skin and every breath you take goes away faster. Even when the room is warm, this evaporation pulls heat away from your body, making you feel a little cooler. The radiator may be working perfectly, but your body doesn’t agree with it.
 Psychologists Identify 9 Common Phrases Self-Centered People Use Without Realizing Their Impact
When you put a glass of water near the heat, it will slowly warm up and let out moisture through gentle evaporation process. Even a small rise in humidity can help keep your skin and lungs from losing moisture. The temperature stays the same, but the air feels softer warmer comfortable.
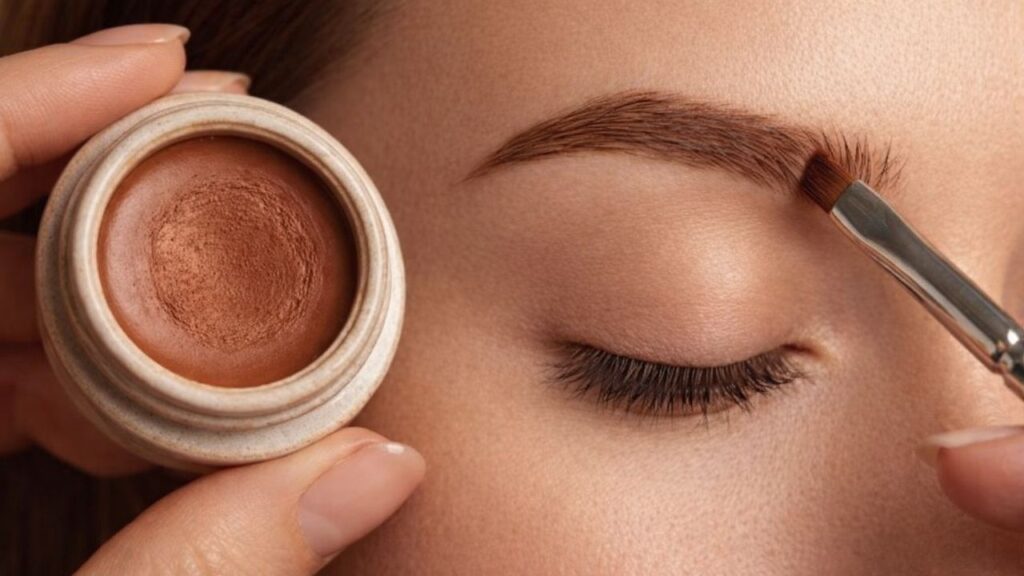
Aloe Vera as a Soft Brow Base
For hundreds of years, aloe vera has calmed skin, even before it was sold as a cosmetic. The gel feels cool light texture, and not sticky when it is pure. It works quietly on eyebrows, giving you control without making them stiff.
Aloe is the main ingredient in a homemade brow gel. Its natural texture gives it a light to medium hold, which keeps brow hairs in place while letting them move naturally. When you use a high quality gel with few additives, it also adds a little moisture, which makes styling into care.
Cocoa Powder for a Natural Look
The natural colour of cocoa powder gives it depth and warmth. Its soft brown colour goes well with light to medium-dark brows, giving them shape without making them look too harsh. When mixed with aloe, it gives a subtle stain like effect instead of a bold, painted look.
The amount of something controls the outcome. A small pinch makes the colour a little stronger, while a little more makes it darker. The colour blends in with natural brows so there are no harsh lines. Using a common kitchen item to frame the face gives it a quiet sense balance between beauty and simplicity.
Setting Up Your Simple Brow Gel
Making brow gel at home is more like a relaxing routine than a beauty task. You just need a clean jar small spoon, and a spoolie brush. The process is slow and hands on approach, which encourages focus instead of rushing.
Dennis Wolf talks about how to balance PEDs and stay in shape for a long time in professional bodybuilding career.

Dennis Wolf talks about how to balance PEDs and live longer in professional bodybuilding world.
The formula is as simple as using just aloe vera gel and cocoa powder. You can add things later, like a drop of jojoba oil to make it smoother or a pinch of coffee or charcoal to make it darker. The appeal is in its simplicity just two ingredients mixed together carefully.
- Pure aloe vera gel (2 teaspoons): This is the base. It gives natural hold, smooth application, and moisture.
- ¼ to ½ teaspoon of unsweetened cocoa powder gives brows a soft, natural colour.
- A small clean glass jar is used to mix and store the finished gel safely.
- Spoolie or angled brow brush: Helps you evenly apply and shape the gel.
- Mini spoon or mixing stick: Used to mix things together smoothly.
Slowly and evenly mixing the gel
Put the aloe vera gel in a clean jar with a spoon. Add the cocoa powder and stir gently, breaking up any lumps as you go. The clear gel slowly changes colour to a smooth, earthy brown.
Put the shade on the back of your hand and let it dry for a short time. Add more cocoa to make it deeper or more aloe to make it softer. The finished texture should be creamy and light, thick enough to cling to a brush without feeling heavy. After mixing, close the jar and let it sit for about an hour so that the mixture settles evenly.
Putting on the Gel with a Light Touch
Begin with clean dry brows. Dip a spoolie lightly into the gel and remove any excess product gently. Brush through the brows using short, gentle strokes that follow the natural direction hair growth.
Start at the inner brow and move outward, shaping rather than drawing. For added definition, allow the first layer to dry before applying another, focusing on sparse areas. An angled brush can help mimic individual hairs if needed. The finish stays soft and flexible, never stiff.
Choosing Simplicity in Daily Care
Creating a product at home carries quiet intention and purpose. It reduces waste, limits unnecessary ingredients use, and brings awareness back to the act of making. Each refill of a small jar replaces a disposable tube, and each application reinforces that beauty doesn’t need to be complicated.
Natural solutions are personal, and paying attention to your skin is essential. Patch testing and small adjustments are part of the process. Still, there is value in slowing down, mixing something by hand, and shaping your brows with care rather than haste.
In that brief moment—brush in hand, cocoa-scented gel nearby—it becomes clear that beauty can be gentle practical deeply personal. Sometimes, it begins with the simplest things.