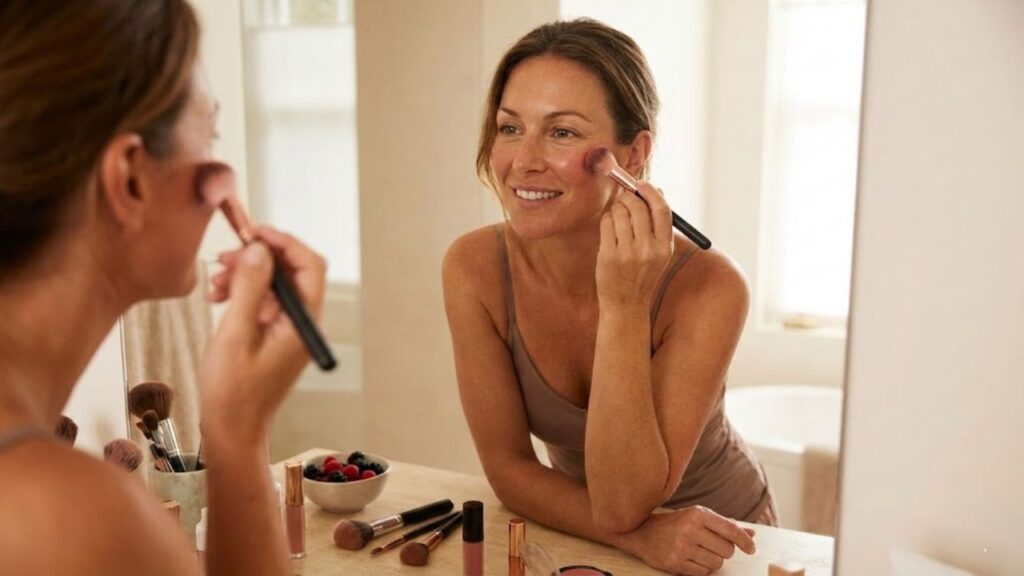
The woman staring into her bathroom mirror looks almost the same as she did at 25 — but not exactly. Her cheeks sit a little lower now. The rounded fullness that once lifted brightly when she smiled blends more softly into her jawline. She reaches for her trusted blush brush and follows the routine she has used for years: smile, tap color onto the apples of her cheeks, blend. Then she pauses. Instead of looking fresh, her face appears slightly droopy. Shadows under her eyes seem deeper, and the center of her face looks heavier.
She wipes it off and tries again, this time placing the blush a little higher and further back. Instantly, her cheekbones look sharper. Her eyes seem brighter. Her whole face appears subtly lifted. The blush hasn’t changed. She hasn’t changed. What changed is the placement.
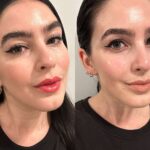
Blush Placement Technique
Why Traditional Blush Placement Feels Different After 30
There comes a quiet phase in life when your makeup routine suddenly feels off. There isn’t a dramatic moment — you simply notice that the same techniques don’t give the same results. Blush is often the first sign. Applying it low and round on the apples of the cheeks can make a 32-year-old look tired by evening. The color that once added freshness now settles closer to smile lines and the area around the nose and mouth.

A London makeup artist once shared that she can often estimate someone’s age by watching how they apply blush. Younger faces benefit from color placed directly at the center of the cheeks. But after 30, subtle facial changes begin. Bone structure stays the same, yet fat distribution shifts slightly downward. If you continue applying blush to the old “smile spot,” you may unintentionally highlight areas that are starting to soften.

She described working with two sisters, aged 28 and 38. Same products. Similar skin tones. On the younger sister, blush on the apples brightened her entire face. On the older sister, that same placement emphasized slight hollows under her eyes. When the blush was moved higher toward the temples, her face instantly looked rested and lifted.
The Modern Blush Placement Map for a Natural Lift
The updated technique is surprisingly simple. Instead of smiling, keep your face relaxed and look straight ahead. Imagine a diagonal line from the top of your ear to the side of your nostril. Apply blush along the upper half of that imaginary line, placing most of the color closer to your ear than your nose.
Think of a soft, angled “C” shape that curves toward the outer corner of your eye. Blend upward into your temples rather than downward toward the center of your face. Let the color fade gently toward your hairline.
Another small but powerful adjustment: leave a finger-width gap between your under-eye area and where the blush begins. This prevents color from settling into fine lines or emphasizing dark circles.
If you love a natural flushed look, add just a subtle touch across the bridge of your nose — but keep the strongest pigment higher and outward. Start with less product than you think you need. Tap instead of sweeping. Build color gradually in thin layers.
Cream or liquid blush formulas often blend more seamlessly on mature skin, while powders can sometimes sit on texture.
If mornings are rushed, remember one rule: higher and further back.
How Blush Becomes a Confidence Reset With Age
Adjusting how you apply blush can feel surprisingly emotional. It’s a small acknowledgment that your face has evolved — and that working with those changes feels better than fighting them.
Friends often say they look tired or “not quite themselves.” Many times, it isn’t drastic aging — it’s simply how light and shadow now move across the face. When color is placed lower, it pulls attention downward. When placed upward, it draws the eye toward cheekbones and eyes, creating energy.
Trying the half-and-half method — one cheek the old way, one cheek lifted — often says more than any tutorial ever could. The difference is subtle but powerful.
 Awake Look Hack: The Simple Eyebrow Technique Makeup Artists Use to Instantly Brighten the Face
Blush stops being about trends and becomes about understanding your own facial structure. There’s no universal map, only a guiding principle: color traveling upward tends to read as lifted and vibrant. Color pooling in the center can read as fatigue.

Key Blush Placement Adjustments
| Main Adjustment | Recommended Method | Aesthetic Benefit |
|---|---|---|
| Lift the placement zone | Apply blush above the ear-to-nose axis toward the temples | Creates a natural lifting effect without heaviness |
| Protect the under-eye area | Leave a finger-width gap below the eyes | Softens the look of dark circles and fine lines |
| Use diagonal blending | Blend upward in an angled motion instead of circular | Enhances cheekbone definition |
| Choose suitable texture | Opt for cream or liquid formulas on mature skin | Provides smoother, skin-like finish |
| Apply gradually | Build color in light layers rather than one heavy swipe | Keeps glow fresh and natural |